Welcome to this guide on implementing a custom model in Annolive, specifically focusing on using GLiNER as the custom model. We will cover the steps for creating a Flask app server for GLiNER and integrating it with Auto-annotation in Annolive.
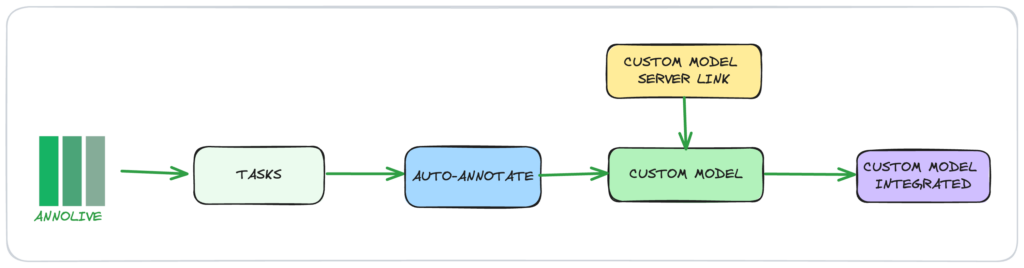
Annolive enables users to utilize both publicly available models and their own custom models in a secure, on-premise environment. Here, we will discuss the steps to integrate GLiNER into Annolive and refine your data.
What are we going to do:
What is GLiNER?
GLiNER is a zero-shot Named Entity Recognition (NER) model that demonstrates strong performance, outperforming both ChatGPT and fine-tuned Large Language Models (LLMs) in zero-shot evaluations across various NER benchmarks.
The paper GLiNER: Generalist Model for Named Entity Recognition using Bidirectional Transformer by Urchade Zaratiana introduced this innovative zero-shot NER model.
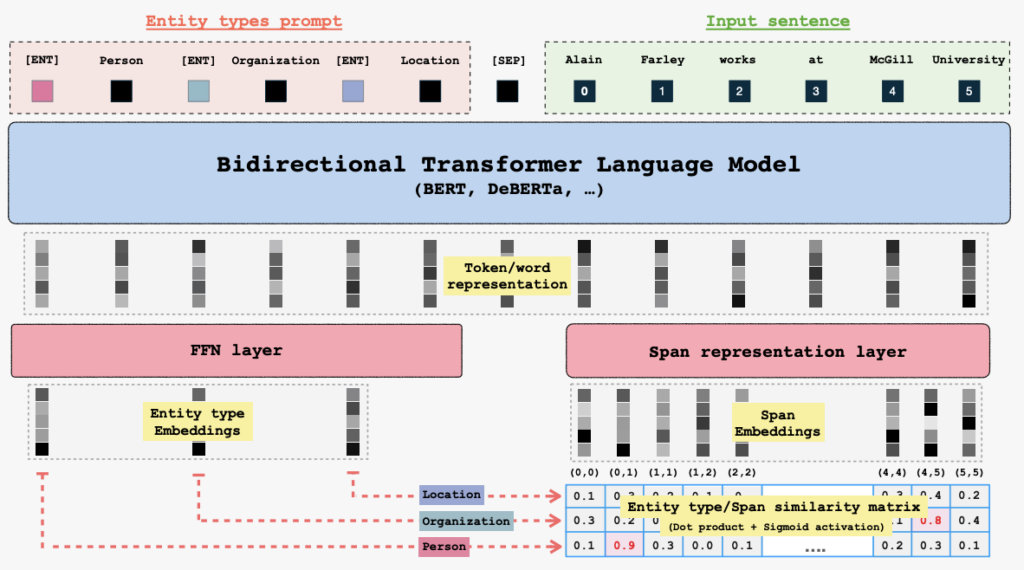
GLiNER employs a Bidirectional Language Model (BiLM) and takes as input entity type prompts along with a sentence or text. Each entity is separated by a learned token, [ENT]. The BiLM generates representations for each token. Entity embeddings are then passed into a Feed-Forward Network, while input word representations are directed into a span representation layer to compute embeddings for each span. Finally, the model computes a matching score between the entity representations and span representations using a dot product followed by sigmoid activation.
1. Create a GLiNER model server link
Create an endpoint that accepts the list of possible labels and the text to output the words and entity tags.
Here we are using a flask endpoint for GLiNER. First create an app.py file as shown below:
Create the file app.py
from flask import Flask, request, jsonify
from gliner import GLiNER
from collections import defaultdict

app = Flask(__name__)

model = GLiNER.from_pretrained("urchade/gliner_largev2")

@app.route('/', methods=['POST'])
def gliner():
    # Get the JSON data from the request
    if request.is_json:
        # Handle JSON data
        data = request.get_json()
    else:
        # Handle form data
        data = request.form.to_dict()
    # Extract context and question from the JSON data

    text = data.get('text')
    labels = data.get('labels')

    entities = model.predict_entities(text, labels)
    answer = defaultdict(list)
    for entity in entities:
        answer[entity["label"]].append(entity["text"])
    # Return the answer as JSON response
    return jsonify({"data": answer})

if __name__ == '__main__':
    app.run(host='0.0.0.0', port=5000)
Now save the app.py file in the drive. Start a google colab with code as given below:
install all the required libraries
!pip install glinerDownload model weights
from gliner import GLiNER
model = GLiNER.from_pretrained("urchade/gliner_largev2")
Clone the git repo
!git clone https://github.com/AnnoliveAI/AnnoliveExamplesRun the flask server
!python /content/AnnoliveExamples/NLP/NER/GLiNER/app.py & npx localtunnel --port 5000This will give a https endpoint running the GLiNER(for example: https://major-parts-drive.loca.lt). Now you have the model server link
All the files can be accessed here
More details on creating the task in Annolive can be found here
2. Integrate the model server link in Annolive auto-annotate
In the task page
- Click on the
auto-annotateoption within thesettingstab. - Activate auto annotation by toggling the enable button.
- Select
custom modelfrom the dropdown menu. - Provide the HTTP link to the custom model interface.
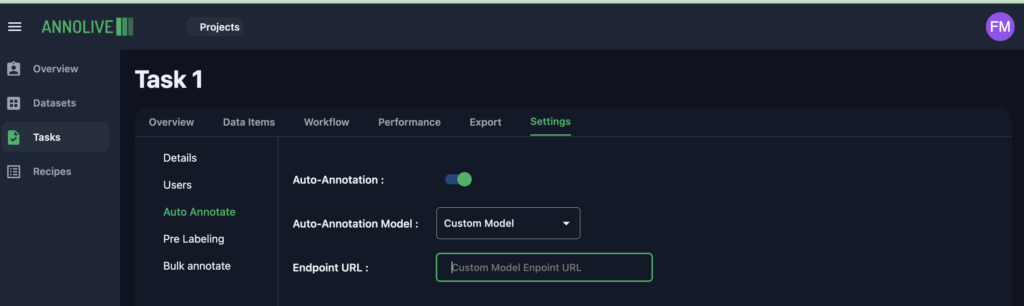
Now, auto annotation using custom model is enabled for both the annotation playground and bulk annotation.
Get started with Annolive for Free : SignUp
FAQs
1. What is GLiNER?
3. Can GLiNER compete with larger models like ChatGPT?
5. Is GLiNER suitable for multilingual tasks?
7. What datasets were used to train GLiNER?
9. Is GLiNER available for public use?
2. How is GLiNER different from traditional NER models?
4. How does GLiNER handle zero-shot Named Entity Recognition?
6. What is required to use GLiNER with Annolive for data annotation?
8. How resource-intensive is GLiNER?
10. What are GLiNER’s main use cases?
References
- GLiNER Huggingface
- GLiNER: Generalist Model for Named Entity Recognition using Bidirectional Transformer
Thanks for reading. Please contact us for any queries.
Last Updated on 19/11/2024